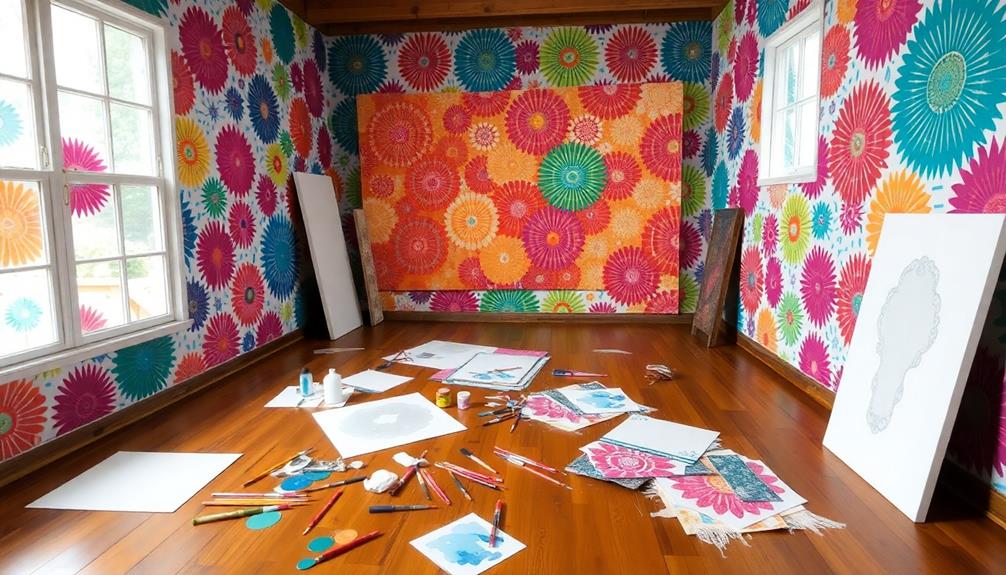
Batik patterns can instantly transform any room into a vibrant masterpiece. Start by choosing absorbent fabric like cotton and gather essential supplies like Bostik Blu Stick and fabric paints. Prepare your fabric by washing and drying it thoroughly. Then, apply adhesive using stencils for clean designs and let it dry. Once ready, carefully paint over the glued areas, allowing each layer to dry. After soaking the fabric in dye, rinse and iron it to set the colors. Mount your artwork on canvas for a stunning display. Want to explore more tips on achieving perfect batik art?
Key Takeaways
- Batik art utilizes a unique resist dyeing technique, allowing for intricate designs that add depth and character to any room.
- Use Bostik Blu Stick for easy and non-toxic glue application, ensuring clean lines and vibrant colors in your batik designs.
- Select cotton fabric for better dye absorption, and pre-wash it to enhance the quality of the final artwork.
- Incorporate trendy colors like Indigo Blue and sophisticated combinations like Charcoal and Gold for a modern aesthetic appeal.
- Create stunning focal points by mixing traditional batik stencils with contemporary patterns, reflecting cultural heritage while enhancing room decor.
Outlet Insulators Draft Sealers, Electric Insulation Switch Socket Cover Pads EVA Foam Replacement Energy Saving Universal Gasket Plates for Wall, Light (White, Double(20Pack)
IMPROVED ENERGY EFFICIENCY: The 3.0 mm/0.12 inch thick air vent insulation gasket seals vents tightly, blocking airflow, reducing...
As an affiliate, we earn on qualifying purchases.
Understanding Batik Art
When you immerse yourself in the world of batik art, you'll discover a rich history that spans centuries, rooted in a unique resist dyeing technique. This fascinating method involves applying hot wax to fabric, creating intricate designs that resist dye penetration.
Once you dye the fabric, the areas covered in wax remain untouched, revealing the vibrant colors of the base fabric. Batik art often features vibrant colors and intricate patterns, similar to the Indonesian Decorative Pillows that enhance living spaces with cultural heritage.
What makes batik truly exciting is its adaptability. While traditional batik relies on wax, contemporary approaches encourage the use of a glue stick, like Bostik Blu Stick, making the process more accessible for everyone.
You can explore this art form on various materials, including cotton fabric and paper, allowing your creative ideas to flow freely across different mediums. One of the benefits of exploring this art form on different materials is the ability to experiment with various hand tracing techniques. From intricate designs to bold patterns, hand tracing allows for endless possibilities in creating unique and personalized artworks. By incorporating hand tracing techniques, you can add a personal touch to your creations and bring a sense of authenticity to your art.
Batik art isn't just for seasoned artists; it invites everyone to experiment with bold patterns and designs. Whether you're a child or an adult, this technique provides an ideal outlet for self-expression.

Window Air Conditioner Side Insulated Panel, WinterSummer Winter Heat and Draft Insulating,Insulation Foam Material,2 Pieces of 17 inches * 10 inches*0.79inches EVA
Multi functional design: The insulation board is made of a new type of EVA material, with a smoother...
As an affiliate, we earn on qualifying purchases.
Essential Supplies for Batik
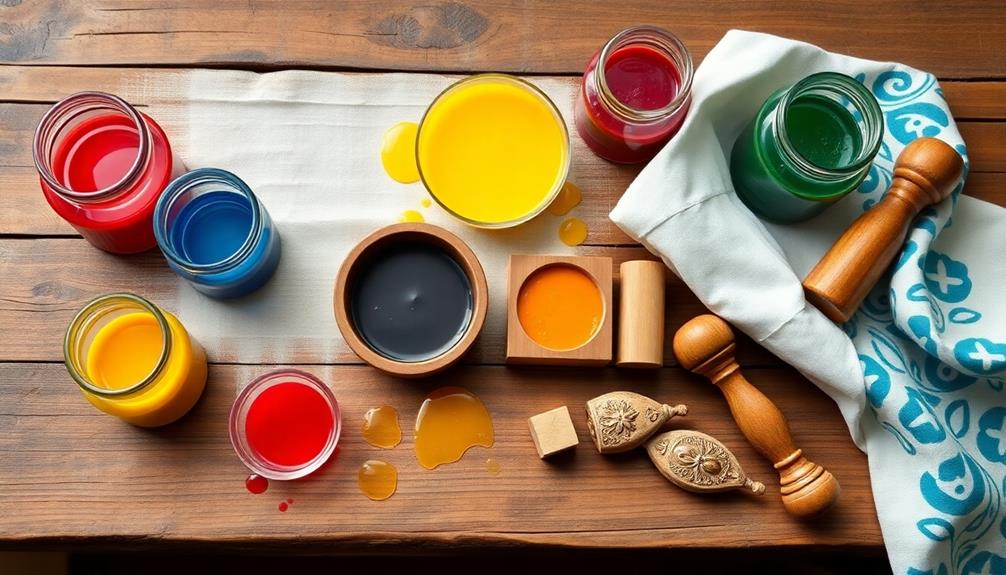
To initiate your batik journey, you'll need a few essential supplies that make the process enjoyable and effective. Start with cotton fabric, like an old pillow cover, as it's highly absorbent and easy to dye. You'll also need Bostik Blu Stick, an acid-free and non-toxic adhesive perfect for your projects.
For creating intricate designs, leaf stencils are essential, allowing you to replicate patterns with ease. You'll want to have a selection of fabric paints on hand; choose thin paints for smooth color application over the glued areas.
Lastly, a sturdy canvas will help you mount your finished artwork, giving it a professional touch while providing a way to repurpose old materials creatively.
Here's a handy table to visualize your supplies:
| Supply | Purpose | Remarks |
|---|---|---|
| Cotton Fabric | Base for batik art | Use old pillow covers |
| Bostik Blu Stick | Adhesive for stencils | Acid-free and non-toxic |
| Leaf Stencils | Create intricate designs | Allows for consistent patterns |
| Fabric Paints | Add color to designs | Thin paints for easy application |
With these essentials, you're ready to plunge into the world of batik art!
STARTONECO Reflective Aluminum Foil Bubble Insulation Roll 48" x10 Ft -B2 Fireproof Radiant Barrier Thermal Shield for Windows, Garage, RV, HVAC | Keep Heat in/Out | Energy Saving Home Insulation
【Premium Material】✅B2 Fireproof Reflective Window Insulation is well made , Totally area 38 Square foot,Width 47.2Inch, Length 118Inch....
As an affiliate, we earn on qualifying purchases.
Preparation Techniques for Success

When you're gearing up for your batik project, selecting the right fabric is key to achieving stunning results.
Consider how your chosen stencil design will work with your fabric type and colors to create a harmonious look.
Additionally, incorporating elements of traditional artistry can elevate your design, making it more reflective of rich cultural heritage.
Planning these elements ahead of time will set you up for a smooth and successful crafting experience.
Fabric Selection Tips
Choosing the right fabric is essential for successful batik projects. Opt for natural fibers like cotton or silk, as they absorb dyes better and yield vibrant colors. Additionally, consider incorporating traditional motifs inspired by Indonesian decor masks to elevate your batik design. Avoid synthetic materials, since they won't achieve the same stunning effects.
Before diving into your batik artwork, pre-wash your fabric in hot water with detergent. This step removes sizing and prepares the fibers to absorb the dye more effectively. After washing, iron the fabric to eliminate wrinkles, ensuring a smooth surface that makes applying designs much easier.
When selecting your fabric, consider cutting it larger than the intended canvas size. This extra material will help you wrap and secure the edges neatly once your artwork is complete.
It's also wise to conduct a dye sample test on your chosen fabric. This way, you can see how it reacts to the dye and confirm that you'll achieve your desired color outcome before you commit to a larger piece.
With these fabric selection tips, you'll set yourself up for success and be well on your way to transforming any room into a work of art with your batik creations!
Designing With Stencils
With your fabric ready and waiting, it's time to explore the art of designing with stencils. This technique can truly transform your room into a stunning artwork, especially when combined with natural materials and earth tones for a Balinese-inspired aesthetic.
Here's how to guarantee success with your stencil design:
- Select a Stencil: Choose a design that matches your room's aesthetic, be it floral or geometric patterns, ideally reflecting traditional Balinese motifs.
- Prepare the Surface: Clean the area thoroughly. If needed, apply a base coat of paint and let it thoroughly dry.
- Secure the Stencil: Use painter's tape to secure your stencil to the surface. This prevents movement and guarantees clean lines.
- Apply Paint: Use a stencil brush or sponge to apply paint lightly. Dab rather than brush to avoid bleeding under the edges.
After applying the paint, remove the stencil carefully while the paint is still wet for the best results.
Allow the design to dry thoroughly before considering layering designs with additional stencils. By following these steps, you'll master this painting technique and create beautiful artwork that enhances your space!

Furnace Filter Air Whistle Alert & Circuit Breaker ID Tag | Outlet Caps Energy Saving Device | Heating & Air Conditioning Efficency
Winterize your home Save energy & money!
As an affiliate, we earn on qualifying purchases.
Step-by-Step Application Process
Now that you're ready to create your batik masterpiece, let's go through the application process step-by-step.
Start by preparing your fabric and applying glue techniques to set up your design. Incorporating elements like Indonesian decor masks can enhance the cultural richness of your artwork.
Then, you'll move on to dyeing and finishing steps that bring your artwork to life.
Preparing the Fabric
Often, the first step in preparing your fabric for a batik pattern involves washing it in hot water with detergent. This removes any sizing and dirt, guaranteeing better dye adhesion.
Once your fabric is clean, dry it thoroughly. Incorporating elements of traditional Indonesian style in your batik design can enhance the overall aesthetic, reflecting the rich cultural heritage.
Next, follow these steps to prepare your fabric for the design process:
- Cut the Fabric: Make certain to cut your fabric larger than the intended canvas size. This allows for wrapping and securing it flat on a protected surface.
- Sketch or Stencil: Lightly sketch your design on the fabric with a pencil or use stencils. This will guide your patterns and spark creativity.
- Apply Glue: Use Bostik Blu Stick on the areas where you want to resist the dye. Guarantee even coverage and let it dry slightly for better adhesion.
- Avoid Overlap: After applying the glue, be careful not to overlap the lines. This helps maintain clear patterns before you engage in the dyeing process.
Applying Glue Techniques
Starting the glue application process requires careful attention to detail to achieve crisp and vibrant batik patterns. Begin by applying Bostik Blu Stick to your fabric, using a stencil as a guide to guarantee even coverage. This methodical approach to resist dyeing is essential for maintaining clear patterns.
| Step | Action |
|---|---|
| 1. Apply Glue | Apply the Blu Stick evenly over the fabric. |
| 2. Drying | Allow the glue to dry completely to avoid smudging. |
| 3. Paint Layer | Paint a layer of thin fabric paint over the glued areas. |
Once the glue is visible, it will help you maintain precision throughout the batik process. After the initial paint dries thoroughly, don't hesitate to apply additional layers of glue and paint. This will enhance the design's depth and richness, giving your artwork a striking contrast. Remember, patience is key. Allow each layer to dry before moving onto the next step for the best results.
Dyeing and Finishing Steps
After you've applied the glue and allowed it to dry, the next phase involves dyeing your fabric to bring your batik design to life.
To enhance the overall aesthetic of your space, consider integrating elements from luxury tropical design aesthetics that can complement your batik creation.
Follow these steps to guarantee vibrant colors and a polished finish:
- Prepare the fabric: Begin by washing, drying, and ironing your fabric. A smooth surface is essential for the dye application.
- Mix the dye: Carefully follow the package instructions to create your dye mixture. Don't forget to wear rubber gloves to protect your hands!
- Soak the fabric: Submerge the fabric fully into the dye mixture, making sure it's completely covered. Allow it to soak for the recommended time to achieve your desired color intensity.
- Rinse and dry: Once the dyeing process is complete, rinse the fabric thoroughly in lukewarm water to remove excess dye. Hang it to dry completely.
Once the fabric is dry, it's time to iron it.
Use a protective layer, like paper towels, to remove any wax residue and set the colors, guaranteeing that your final piece maintains its vibrancy.
Enjoy your stunning batik creation!
Finalizing and Displaying Artwork
Once your batik artwork is complete and the paint has dried, it's time to finalize and display your masterpiece. Start by rinsing it in the washing machine to remove any leftover glue, ensuring a clean finish for your batik art. Incorporating vibrant colors and patterns reminiscent of tropical design inspiration can enhance the overall aesthetic of your batik piece.
Once dry, carefully remove the fabric from the cardboard backing to prepare for mounting.
To mount your batik art, use Bostik Blu Stick to adhere the finished batik artwork to a canvas. Apply glue to both the canvas and the back of the fabric for a strong hold. Next, wrap the edges of the fabric around the canvas and trim any excess to create a neat appearance. This step not only enhances the overall look but also helps preserve its quality and colors.
Before you showcase your final piece, store the completed batik art in a cool, dry place to keep it in pristine condition.
Once you've followed these steps, you'll be ready to display your stunning creation in your home, turning any room into a vibrant work of art that reflects your unique style.
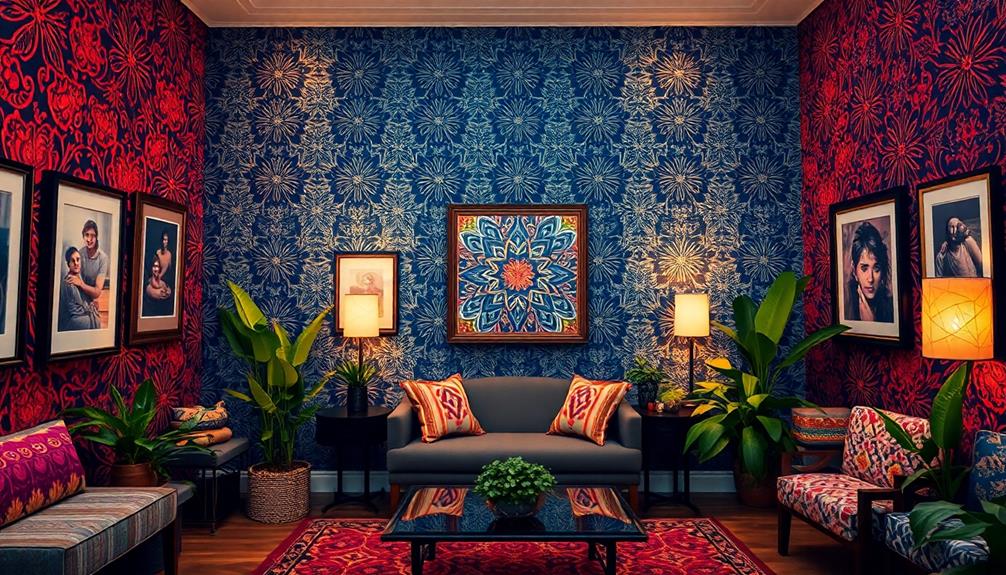
Exploring Design and Color Trends

With your batik artwork ready for display, exploring current design and color trends can elevate your home decor even further. Embracing these trends not only enhances your batik pieces but also creates a cohesive and stylish environment.
Here are some key trends to contemplate:
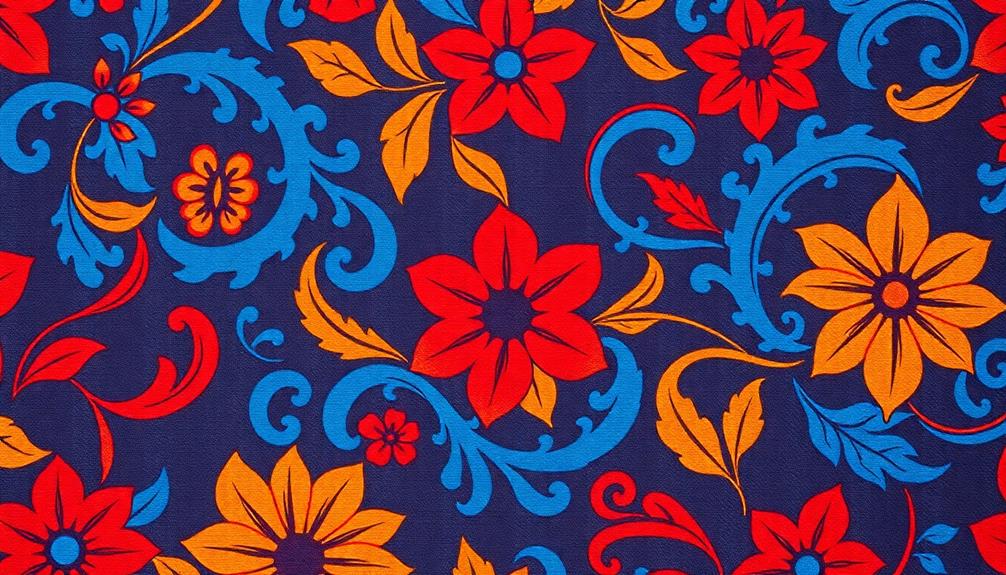
- Indigo Blue: This rich color is trending in home decor and works beautifully in DIY batik projects, offering a bold look that commands attention. It mirrors the vibrant hues often found in traditional Indonesian housing, reflecting cultural significance and identity. Traditional homes often serve as community gathering spaces.
- Tribal Batik Stencils: These versatile design options allow you to mix global patterns with modern aesthetics, adding layers of visual interest.
- Mid-Century Modern: Combining mid-century modern designs with tribal patterns creates a sophisticated atmosphere that enhances your room's aesthetic value.
- Charcoal and Gold: This elegant color combination brings warmth and sophistication, providing a striking contrast that elevates your decor.
Incorporating contrasting colors in your batik designs can add dramatic flair, making your artwork a focal point.
Frequently Asked Questions
What Is the Technique of Batik Art?
Batik art's a resist dyeing technique where you apply hot wax to fabric, creating intricate designs. After waxing, you dye the fabric, revealing vibrant patterns once the wax is removed. It's both fun and creative!
What Are the 5 Major Types of Batik Design?
Did you know that over 1,000 batik patterns exist? You'll find five major designs: Mega Mendung, Parang, Kawung, Sido Mukti, and Truntum. Each one carries unique meanings and cultural significance, enriching the art form.
What Is the Batik Crackle Effect?
The batik crackle effect's created by applying hot wax to fabric, causing cracks during dyeing. You'll see intricate designs as dye seeps into the cracks, adding depth and a unique aesthetic to your projects.
What Is Batik Pattern?
Imagine a canvas where colors dance and swirl; that's batik pattern. It's a vibrant art form, using wax to resist dye, creating stunning, intricate designs that showcase cultural stories and elevate your personal space beautifully.
Conclusion
By incorporating batik patterns into your home, you're not just decorating; you're embracing a vibrant tradition. Did you know that more than 200 million people in Indonesia proudly wear batik, showcasing its cultural significance? Imagine transforming your space into a gallery of colors and designs that tell a story. With the right supplies and techniques, you can create a stunning focal point that reflects your creativity and appreciation for this beautiful art form.