
TL;DR
Moving your rig into a closet or separate room is the most effective way to lower noise. Proper acoustic treatment and ventilation are key to keeping your setup cool and quiet, especially when it’s sealed off.
When your AI rig sounds like a jet engine, the fix isn’t just more foam. It’s about distance, placement, and how you handle heat. The most effective way to cut noise? Put the machine in another room. But what if you’re tight on space or want a quick upgrade? That’s where the ‘rig in the closet’ concept comes in. You can get a quiet, efficient setup—if you understand the tradeoffs and how to manage heat.
This guide breaks down how to turn a closet into a sound-optimized workhorse, with practical tips on placement, acoustic treatment, and ventilation. Expect real-world insights, not fluff. Let’s make your closet the hero of your setup, not the villain.
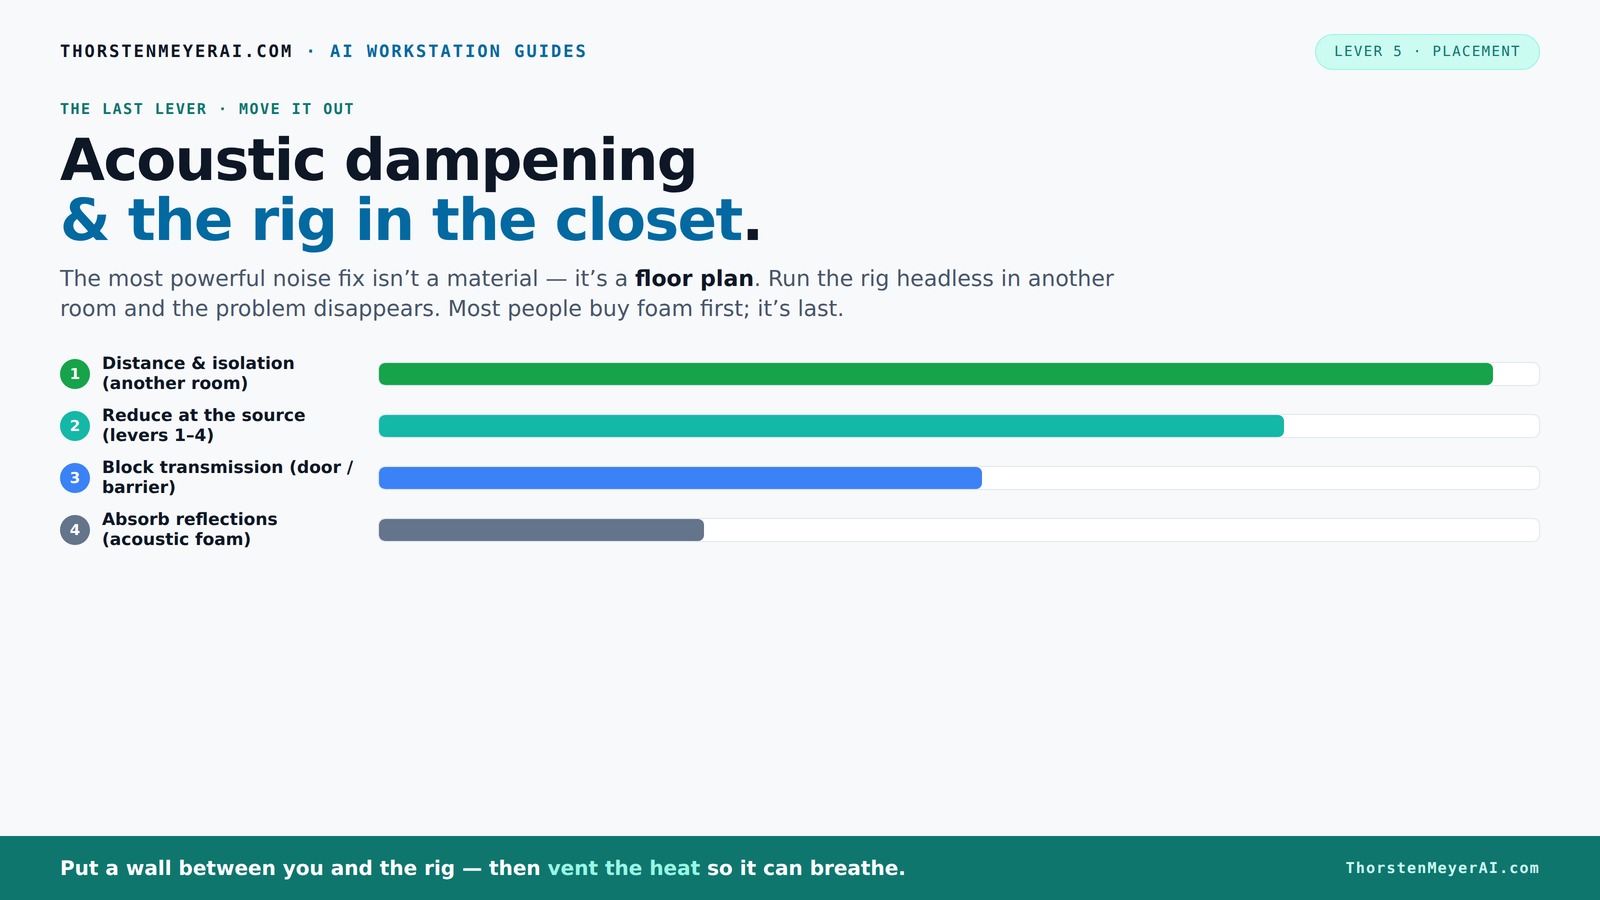
Acoustic dampening
& the rig in the closet.
The most powerful noise fix isn’t a material — it’s a floor plan. A rig you can’t hear because it’s in another room beats any amount of foam. Tap the approaches in Part 1 to see what actually works.
(another room)
(levers 1–4)
(door / barrier)
(acoustic foam)
Contain the noise, not the heat
Key Takeaways
- Distance from the source is the most effective way to cut noise — move your rig into another room if possible.
- Proper ventilation is essential in closet setups to prevent heat buildup, which can cause throttling and noise.
- Acoustic dampening reduces reflections inside your closet, while soundproofing blocks sound transmission.
- Strategic placement of panels—behind the mic, on the ceiling, and on reflective surfaces—maximizes treatment effectiveness.
- Use a combination of gear and DIY fixes: pick the right mic, add bass traps, and seal gaps for a cleaner, quieter setup.

VEVOR Sound Dampening Blankets, Soundproof Curtains with 80 x 48 in, Soundproof Blanket with Grommets, Studio Grommeted Blanket, for Window, Door, Light Blocker, Music Recording, Black
- Sound Absorption & Noise Reduction: Polyester woven surface with recycled cotton filling
- Effective Light Blocking: Thick, dense material in dark color
- Durable Thickened Design: Zig-zag quilting and double-stitched binding
As an affiliate, we earn on qualifying purchases.
As an affiliate, we earn on qualifying purchases.
Why Moving Your Rig Is the #1 Sound Fix You Can Do
Distance and isolation beat everything else for noise control. When you move your rig into another room—say, a basement, closet, or spare office—you cut the sound at the source. No foam, no barriers will match that power. Imagine working on a complex AI model, hearing nothing but silence. That’s the magic of putting space between you and the machine.
For example, I set up a GPU rig in my basement's closet. Once I ran the Ethernet, I could work in the living room without hearing a thing. It’s cleaner, easier, and way less stressful than constantly fighting reflections or hoping foam absorbs everything.
The key is to keep the connection wired—Wi-Fi can introduce lag and dropouts. Ventilation is the other side of the coin—your rig needs airflow to stay cool, or it’ll throttle and get noisy anyway.
The "Rig in the Closet" Setup: How to Keep It Cool & Quiet
Placing a high-power machine in a closet is a smart move but comes with a big caveat: heat. A sealed space traps warmth like a greenhouse, and that’s a recipe for throttling fans and noise. To make it work, you need airflow—either passive vents or a quiet exhaust fan. Think of it as giving your rig a window to breathe.
For instance, I added a small, quiet attic fan to my closet setup. It pulls hot air out, drawing in cooler air through a vent. The result: my GPU runs at 65°C instead of throttling at 80°C, all while staying whisper-quiet.
Serious setups use soundproof cabinets with ducted airflow and thermostatic control—these are worth the investment if silence and coolness matter. Proper ventilation prevents heat buildup, which not only throttles performance but can also shorten hardware lifespan. The tradeoff is that more ventilation can introduce noise if not carefully designed, so choosing quiet fans and strategic placement is crucial. You can learn more about acoustic dampening and placement techniques. Check out [this guide](https://thorstenmeyerai.com/reduce-heat-noise-ai-workstation/) for detailed airflow strategies.
Acoustic Dampening vs. Soundproofing: What You Need to Know
Acoustic dampening and soundproofing serve different purposes, and understanding their implications helps you make smarter choices. Dampening materials like foam, blankets, or rugs primarily absorb and scatter sound waves within the space. This reduces internal echo, flutter, and harsh reflections, which can muddy recordings or cause fatigue during long sessions. However, dampening alone doesn’t prevent sound from escaping; it just makes the sound inside more controlled. If your goal is to prevent noise from leaking out, then dampening is insufficient.
Soundproofing involves sealing gaps, adding insulation, or constructing barriers—like extra drywall—that block sound transmission. Think of dampening as softening a drum’s echo to improve clarity, while soundproofing is like building a wall to keep sound from leaving the room. Both are important, but they address different issues. For instance, I lined my closet with foam panels to improve the sound inside, then sealed every crack with acoustic caulk to prevent sound leakage. This layered approach is essential for a balanced setup—improving both internal sound quality and external noise control.
Where to Place Acoustic Treatment for Max Results in a Closet
Placement of acoustic treatment is crucial because sound waves bounce off surfaces in predictable ways. To optimize your closet setup, start by addressing the reflection points—these are spots where sound waves bounce directly back into the microphone or your ears. The most effective placement is behind the mic and on the ceiling, as these are common reflection points. For more tips, see this guide. Covering side walls and the door with absorbent materials helps minimize flutter echoes and standing waves, which can cause coloration and muddiness in recordings. Proper placement ensures that sound is absorbed before it can bounce around, leading to clearer, more accurate audio.
For example, I placed foam panels directly behind my mic, which is the primary reflection point, and added blankets on the door and ceiling. This not only reduced flutter echoes but also made my vocal recordings sound more natural and less room-dependent. The floor, which often reflects sound, benefits from a rug or carpet, further reducing reflections and improving overall sound quality. Using the 'mirror trick'—a simple way to find reflection points—can help you identify where to place panels for maximum effect. Simply position a mirror on the wall and move it around while seated at your microphone—any spot where you see the mic’s reflection is a prime candidate for treatment.
How to Deal with Small Space Challenges Like Standing Waves & Low-End Buildup
Small spaces like closets often create acoustic issues such as standing waves—resonances that amplify or cancel certain frequencies. These are especially problematic at low frequencies, making your recordings sound boomy, hollow, or uneven. If left unaddressed, these resonances can cause your audio to lack clarity and consistency, particularly in the bass range. Consider adding bass traps to improve low-end response. To combat this, adding bass traps—thick panels designed to absorb low frequencies—in the upper corners of your closet is highly effective. For instance, I installed 4-inch thick bass traps in my closet corners, which significantly smoothed out the low end and improved the overall tonal balance. These traps work because low-frequency waves tend to gather in corners, and absorbing them prevents the buildup that causes boominess.
Another approach involves angling panels or adding diffusers—these break up standing waves and distribute sound more evenly. DIY solutions like using dense foam or even furniture placed strategically can also help. The key is to identify where low-end resonances occur (using a measurement microphone or spectrum analyzer) and target those spots specifically. Addressing these issues results in a more balanced sound, making your recordings clearer and more professional, even within a tight space.
Choosing the Right Gear & How It Changes Your Closet Setup
Microphone choice is critical in tight, reflective spaces because different microphones react differently to room acoustics. Dynamic microphones like the Shure SM58 or SM57 tend to reject more room noise and are less sensitive to reflections, making them ideal for closet setups where acoustic treatment may be limited. Condenser microphones, while offering brighter and more detailed sound, can also pick up every echo and reflection, which can be problematic in small, untreated spaces. Therefore, selecting the right mic involves understanding the tradeoffs: a dynamic mic can help reduce the need for extensive treatment, but may lack the high-frequency detail of a condenser.
Size and thickness of acoustic panels also influence your setup. For small closets, 2-inch panels are usually sufficient to absorb mid and high frequencies, whereas larger or more problematic spaces benefit from 4-inch panels that better absorb lower frequencies. Additionally, installing bass traps in the corners is essential if you notice low-end buildup. The combination of gear and treatment choices directly impacts your acoustic environment. For example, using a dynamic mic paired with well-placed foam panels can significantly improve clarity without extensive modifications. The choice of gear and treatment affects the overall workflow, noise levels, and sound quality, so consider your specific needs and space constraints carefully.
Quick DIY Tips & Cost-Effective Tricks for a Better Closet Rig
Improving your closet rig doesn’t have to break the bank. Simple, cost-effective fixes can yield surprisingly good results. Using moving blankets or thick quilts over the door and around the space can significantly reduce sound leaks and reflections. Tacking foam panels or egg crate foam to walls is easy and cheap, and can help absorb higher frequencies, making your recordings clearer. Laying down a thick rug or carpet on the floor prevents reflections and standing waves, especially in small, hard-surfaced spaces. These DIY solutions are quick to implement and reversible, making them perfect for renters or temporary setups.
For mounting, use command hooks, thumbtacks, or adjustable curtain rods to hang blankets and foam panels without damaging walls. DIY bass traps can be made from rolled-up towels, dense foam, or even pillows placed in corners to absorb low frequencies. Sealing gaps around doors with draft stoppers or overlapping blankets prevents sound from escaping, further improving your noise isolation. These simple tweaks, while inexpensive, can dramatically improve your sound environment by reducing unwanted reflections and leaks, making your setup more professional without costly investments.
Frequently Asked Questions
What is the difference between acoustic dampening and soundproofing?
Acoustic dampening involves using foam, blankets, or rugs to reduce echo and reflections inside a space, making recordings clearer. Soundproofing, on the other hand, involves sealing gaps, adding insulation, or extra drywall to block sound from leaking in or out.
Where should I put panels in a closet vocal booth?
Start with the reflection points—directly behind your mic and on the ceiling—since those are where sound bounces back. Cover side walls and the door with absorption materials to cut down on reflections and leaks. Use the mirror trick to find reflection points easily.
Do I need to treat the door or ceiling first?
If your door is a major reflective surface or leak point, treating it with blankets or foam is a quick win. The ceiling is also critical, especially if your closet has a hard, reflective surface. Prioritize based on where sound escapes or reflects most.
Are acoustic foam panels enough for a closet studio?
They help reduce echoes and reflections but won’t block sound transmission. For best results, combine foam with sealing gaps and adding bass traps for low-end issues. This layered approach makes a big difference.
How do I stop echo and flutter reverb in a small closet?
Place foam panels at reflection points—behind the mic, ceiling, and walls—and add soft materials like rugs or blankets on the floor and door. Using angled panels or diffusers can also break up standing waves and reduce echo.
Conclusion
Turning a closet into a quiet, efficient AI or recording rig isn’t magic—it’s about smart placement, ventilation, and targeted treatment. Think of your closet as a mini studio that, when done right, can rival expensive sound booths. The secret is understanding what to treat and where to place it.
Remember: the best soundproofing is often just moving your rig out of reach. When you do, noise stops being a problem, and your workspace becomes a place of focus, not frustration. So, go ahead—give your closet a purpose, and enjoy the peace and quiet it brings.